
The FASS Titanium Signature Series is a high-performance fuel lift pump designed to enhance diesel engine efficiency and reliability. This guide provides a comprehensive installation walkthrough, ensuring proper setup for optimal performance and longevity of your fuel system.
Overview of the FASS Titanium Signature Series
The FASS Titanium Signature Series is a premium fuel lift pump designed for diesel engines, offering enhanced performance and durability. Known for its quiet operation and high flow rates, it supports stock and modified engines alike. This pump ensures consistent fuel pressure, reducing the risk of fuel starvation. Its robust construction and advanced engineering make it a reliable choice for drivers seeking improved engine efficiency and longevity. The series is backed by a lifetime warranty, underscoring its quality and reliability.
Importance of Proper Installation
Proper installation of the FASS Titanium Signature Series is critical for optimal performance and longevity. Incorrect setup can lead to issues such as fuel pressure fluctuations, reduced efficiency, or even engine damage. Ensuring all components are correctly connected and aligned is essential to avoid common problems like pulsation or bracket misalignment. A well-executed installation guarantees reliable fuel delivery, maximizing the pump’s performance and protecting your investment in the FASS system.

Pre-Installation Checklist
Gather all tools and materials, prepare the vehicle, and ensure safety measures are in place before starting the FASS Titanium Signature Series installation process.
Tools and Materials Required
Tools and Materials Required
To install the FASS Titanium Signature Series, gather essential tools and materials. These include wrenches (1/2″ and 3/8″), pliers, Teflon tape, a fuel pressure test kit, and a drain pan. You’ll also need fuel line, fittings, and a fuel filter. Ensure all components are compatible with your vehicle’s specifications. Proper tools and materials are crucial for a smooth, leak-free installation and to maintain the system’s performance and longevity.
Vehicle Preparation and Safety Measures
Before starting the installation, ensure your vehicle is on level ground and in park with the emergency brake engaged. Disconnect the battery to prevent accidental engine start. Wear protective gear, including gloves and safety glasses. Locate the fuel tank and ensure the area is clear of flammable materials. Use jack stands for added stability if raising the vehicle. Proper preparation and safety measures are essential to avoid accidents and ensure a successful installation process.
Fuel System Preparation
Before installation, drain and clean the fuel tank to remove contaminants. Inspect fuel ports for compatibility with the FASS Titanium Signature Series pump configuration.
Understanding Fuel Port Sizes and Configuration
Ensure your vehicle’s fuel system ports match the FASS Titanium Signature Series specifications, typically 1/2-inch ports for optimal flow. Verify compatibility with your engine type, such as Duramax 2500 and 3500 models, to maintain proper fuel pressure and flow rates. Incorrect port sizes can lead to reduced performance or potential system damage, so double-check the configuration before proceeding with installation.
Draining and Cleaning the Fuel Tank
Before installing the FASS Titanium Signature Series, drain and clean the fuel tank thoroughly. Contaminants like dirt, rust, or old fuel can damage the new pump. Use a fuel-safe cleaning solution to scrub the tank interior, then rinse with clean diesel fuel. Allow the tank to dry completely before proceeding. Avoid using abrasive materials that might scratch the tank surfaces. A clean system ensures optimal fuel flow and prevents premature wear on the pump.
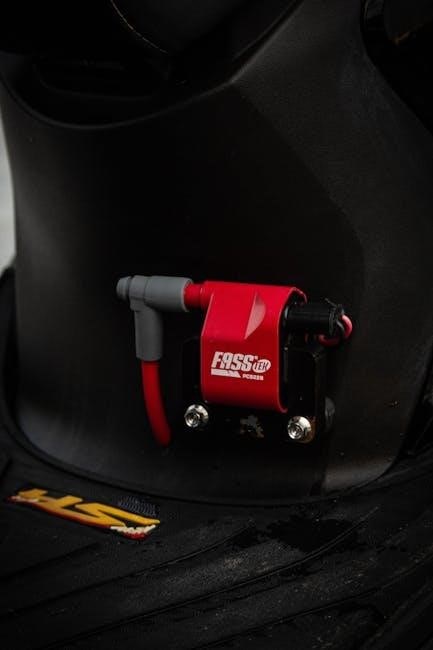
Mounting the FASS Titanium Signature Series Pump
Mounting the FASS Titanium Signature Series pump requires selecting a stable location to minimize vibration. Secure the pump bracket firmly using provided hardware to ensure proper operation and durability.
Choosing the Optimal Location for the Pump
Selecting the right location for the FASS Titanium Signature Series pump is crucial for performance and longevity. Ensure the area is stable, dry, and protected from excessive vibration. Choose a spot close to the fuel tank to minimize suction issues and ensure proper fuel flow. Avoid areas exposed to direct heat sources or moisture. Accessibility for future maintenance is also important. Proper placement helps maintain consistent fuel delivery and prevents potential damage to the pump and surrounding components.
Securing the Pump Bracket and Hardware
Ensure the pump bracket is firmly bolted to a stable surface using the provided hardware. Tighten all bolts in a star pattern to avoid misalignment. Use threadlocker to prevent loosening over time. Verify the bracket is level and properly aligned with the fuel tank. Double-check all connections for tightness and ensure no components are over-torqued. Consult the installation manual for specific torque specifications. A secure installation prevents vibration damage and ensures reliable fuel delivery. Visual inspection after tightening is recommended to confirm stability and safety.

Connecting Hoses and Fittings
Connect the fuel hoses to the FASS pump and fittings, ensuring compatibility and secure connections. Tighten all fittings properly to prevent leaks and maintain fuel flow integrity.
Inspecting and Cutting Hoses to Length
Before connecting, inspect the fuel hoses for any damage or kinks. Measure and cut the hoses to the required length using a sharp utility knife or hose cutter. Ensure clean, square cuts to prevent fuel flow restrictions. Deburr the ends to avoid damaging the fuel lines during installation. Double-check the measurements against the vehicle’s specifications to confirm proper fitment and compatibility with the FASS Titanium Signature Series pump and fittings.
Installing Fuel Lines and Fittings
Install the fuel lines by attaching the pre-cut hoses to the FASS pump and vehicle fuel ports. Secure the fittings using the provided hardware, ensuring they are tightened properly to avoid leaks. Use thread sealant on threaded connections for added protection. Align the fuel lines neatly, avoiding any twists or kinks that could impede fuel flow. Double-check all connections for tightness and integrity before proceeding to the next step in the installation process.
Electrical Wiring and Connections
Connect the power wire to the battery terminal and ground wire to a clean metal surface. Use the provided wiring harness and ensure all connections are secure and free from corrosion for reliable operation.
Understanding the Wiring Harness
The wiring harness included with the FASS Titanium Signature Series is designed to simplify installation. It features color-coded wires for easy identification: red for power, black for ground, and yellow for fuel pressure sensor connectivity. Each wire is pre-terminated with weatherproof connectors to ensure durability and prevent corrosion. Proper routing of the harness is essential to avoid interference with other vehicle components.
Connecting Power and Ground Wires
Connect the red power wire to a switched power source, such as the battery or a keyed ignition circuit, using a 40-amp circuit breaker. The black ground wire should be securely attached to a clean, bare metal surface on the chassis. Ensure all connections are tight and free from corrosion. Route the wires away from heat sources and moving components. Use grommets or protective sleeves to prevent abrasion. Double-check the wiring diagram for accuracy before powering up the system.

Fuel Pressure Gauge Installation
Mount the fuel pressure gauge in an accessible location, ensuring visibility. Connect the gauge to the fuel system using the provided fittings. Calibrate according to manufacturer instructions to monitor fuel pressure accurately.
Mounting the Fuel Pressure Gauge
Mount the fuel pressure gauge in a visible location, typically near the dashboard. Use the provided hardware to secure it firmly. Ensure the gauge is level and accessible for monitoring. Connect the electrical wiring to the gauge, following the manufacturer’s wiring diagram. Attach the fuel line to the gauge’s port, using the included fittings. If pulsation occurs, install a snubber inline to stabilize the reading. Proper mounting ensures accurate fuel pressure monitoring and enhances overall system performance.
Calibrating the Fuel Pressure Gauge
Calibrate the fuel pressure gauge by ensuring it matches your engine’s fuel system specifications. Turn the ignition on and monitor the gauge at idle. Adjust the gauge’s calibration screw until the reading aligns with the recommended pressure. If pulsation occurs, install a snubber inline to stabilize the gauge’s needle. Proper calibration ensures accurate fuel pressure readings, which are crucial for diagnosing system performance and maintaining optimal engine operation. Refer to your vehicle’s manual for specific pressure ranges and setup requirements.
Post-Installation Checks and Tests
After installation, ensure the fuel system operates smoothly by checking for leaks, verifying proper connections, and testing fuel flow. Monitor the fuel pressure gauge for stability and accuracy. Address any irregularities promptly to maintain optimal performance and prevent potential issues.
Testing Fuel Flow and Pressure
After installation, turn the ignition to the “on” position without starting the engine to pressurize the fuel system. Use a fuel pressure gauge to verify pressure matches manufacturer specifications. Check for any noticeable drops in pressure, which could indicate a blockage or faulty connection. If pulsations occur, consider installing a fuel pressure snubber to stabilize the system. Ensure all components function correctly under various operating conditions to guarantee reliable performance and prevent future issues.
Inspecting for Leaks and Connections
After installation, inspect all fuel lines, fittings, and connections for leaks. Use soapy water to detect bubbles, which indicate escaping fuel. Ensure all fittings are securely tightened and properly seated. Verify that hoses are not pinched or twisted, and that all connections are free from debris. Double-check the pump mounting bracket for stability and alignment to prevent vibration-related issues. Address any leaks promptly to avoid fuel loss and potential system damage, ensuring a safe and reliable fuel system operation.

Troubleshooting Common Issues
Address fuel pressure pulsation by installing a snubber. Resolve bracket and hose length issues by adjusting or replacing components. Consult FASS support for tailored solutions.
Addressing Fuel Pressure Pulsation
Fuel pressure pulsation can occur due to improper installation or worn components. Install a snubber to absorb pressure spikes, ensuring stable readings. If pulsation persists, check for faulty fuel lines, clogged filters, or incorrect pump calibration. Consult the FASS Titanium Signature Series manual or contact FASS support for tailored solutions to maintain optimal fuel system performance and reliability.
Resolving Bracket and Hose Length Issues
If the bracket or hose length doesn’t fit properly, adjust the bracket by bending it slightly or consult FASS support for alternatives. Some users opt for a beans sump instead of the draw straw for better compatibility. Ensure hoses are correctly routed and trimmed to the recommended length to avoid kinking or restriction. Proper alignment and secure fastening of the bracket are crucial for long-term reliability and performance of the FASS Titanium Signature Series fuel system.
Proper installation of the FASS Titanium Signature Series ensures enhanced fuel delivery, improved engine performance, and long-term reliability. Always follow manufacturer guidelines for optimal results.
Importance of Following Manufacturer Guidelines
Adhering to FASS manufacturer guidelines ensures a safe and effective installation. Proper steps prevent fuel system damage and guarantee optimal pump performance. Deviating from instructions can lead to reduced efficiency, potential component failure, or even safety hazards. By following the manual, you maintain warranty coverage and ensure a reliable fuel supply system for your vehicle.
Benefits of Proper Installation for Vehicle Performance
A correct installation of the FASS Titanium Signature Series ensures improved fuel flow and pressure, enhancing engine performance and efficiency. Proper setup reduces wear on fuel system components and prevents premature failure. It also maintains optimal power delivery and minimizes the risk of fuel starvation, especially under high-demand conditions. A well-installed system promotes smoother operation, better fuel economy, and extends the lifespan of both the pump and engine.